Free FormSpree alternative to handle forms on static sites
In the early days of the internet, the information on the web consisted of just static pages. When it became interactive people started generating web pages on the server, making them more dynamic in nature.
With the advent of new technologies and site generators, a new philosophy of serving web pages is making us think about static pages again.
This new philosophy or architecture is called JAMstack which stands for JavaScript, APIs and Markdown stack.
The whole idea of JAMstack is to serve websites as static pages, giving dynamic nature using JavaScript, and exchange data through APIs.
As a result, it makes the developer experience simpler, improves performance with greater scalability, and reduces the cost of maintenance.
There are many static site generators available these days viz., NextJS, Hugo, Gatsby, etc.
With the help of third-party tools or services, these static sites can be made more dynamic.
Creating and maintaining static sites is inexpensive but adding dynamic features is where one has to spend on third-party tools.
One essential service which almost every website needs is a contact form and handling contact forms on static sites can be done through third-party services as we don't maintain a full-fledged server to handle forms on static sites.
Some of the static site form handling services are FormSpree, FormKeep, GetForm etc. These third-party services come at a price and free tier services have limitations in data and the number of submissions.
But here is a solution that helps you to handle forms on static sites without the need for these third-party tools.
It is called FormEasy which is a FREE and open-source apps script library that helps you to receive forms on static sites with full control of your data.
Form spree is a quite popular service for handling forms on static websites and FormEasy can be the best formspree alternative with all customizations you want.
Let's see how to set up this FormEasy apps script library to handle static site forms.
FormEasy setup
In a few simple steps, forms on static sites can be handled using FormEasy library.
- Create an empty Google sheets file
- Open the Apps Script file connected to it
- Add the FormEasy library using ScriptID
- Add
doPostapps script function - Deploy the apps script code and get the Web app URL to make POST requests
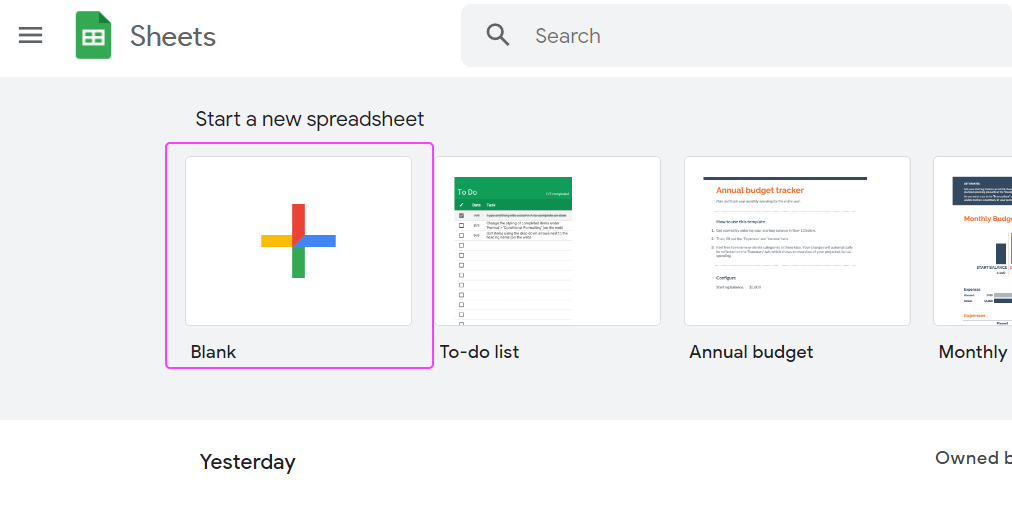
1. Create an empty Google sheets file
Visit this link to create a new blank Google sheets file.
2. Open the Apps Script file
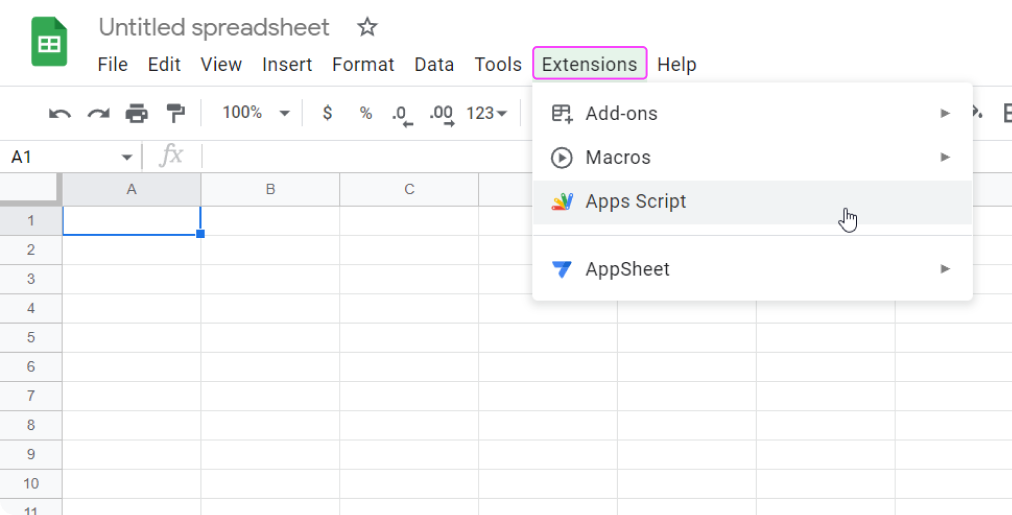
After creating an empty Google sheet file(you can rename the file if you want to), go to Extensions in the menu bar and click Apps Script.
It opens up an apps script file connected with the Google sheet.
3. Add the FormEasy library
In the left bar of apps script file click + button beside Libraries and add the below Script ID and click Look up button.
ScriptID: 1CAyzGbXdwMlko81SbJAjRp7ewxhyGKhDipDK4v8ZvlpYqrMAAzbFNccL |
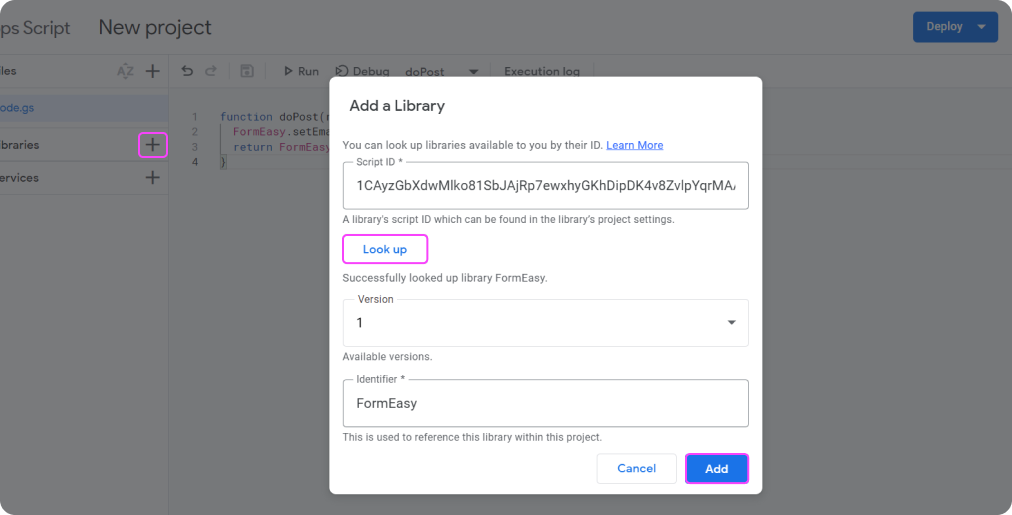
You will see two options Version and Identifier.
Select the latest version to reflect the latest changes made to the library if any or you can select the specific version as per the features you want.
For the identifier, the default name is FormEasy it is the name of the object used to call methods in the library. You can change it if you want but keeping it as it is can help you use the ready code snippets related to FormEasy.
4. Add doPost function
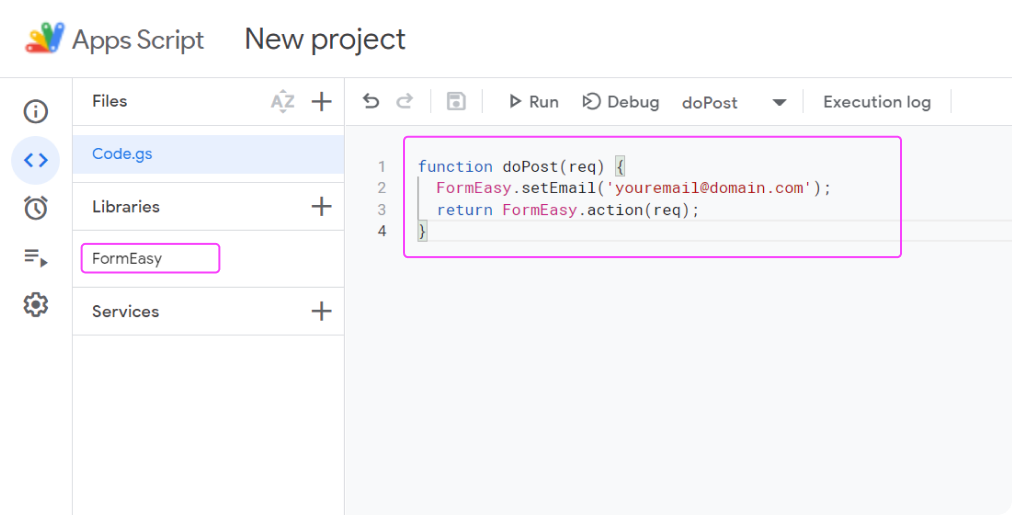
Clear the default functions if any in the default apps script file Code.gs.
Create a function named doPost.
doPost function name is the default name of the function that runs whenever a POST request is made to the script.
Next set the email if you want to get notified whenever any form gets submitted using setEmail method on FormEasy object. (FormEasy is the default identifier if you do not make any changes to the identifier while adding the FormEasy library)
Setting email is optional, the data gets logged in the Google sheet and you will not be notified through email if you do not set the email.
You need to return action method on FormEasy object with the req argument from the doPost function and this is the only mandatory method to use and all other methods on FormEasy are optional.
All the available methods on FormEasy library are:
- setSheet - To select the specific sheet for saving the data(Default is active sheet)
- setEmail - To set the email for receiving notification
- setSubject - To set the subject of the email
- setFormHeading - To set the heading(inside email)
- setFields - To set the fields of the form(Lower case letters, also the keys of the JSON object)
- action - To return the response after submitting the form(Mandatory to return)
The above all are optional methods except the action.
The simplest case looks like below:
function doPost(req) {
  FormEasy.setEmail('[email protected]'); // To receive email notification(optional)
  return FormEasy.action(req); // Mandatory to return action method
}
5. Deploy the apps script code
After saving all the changes to the code, it has to be deployed to use it.
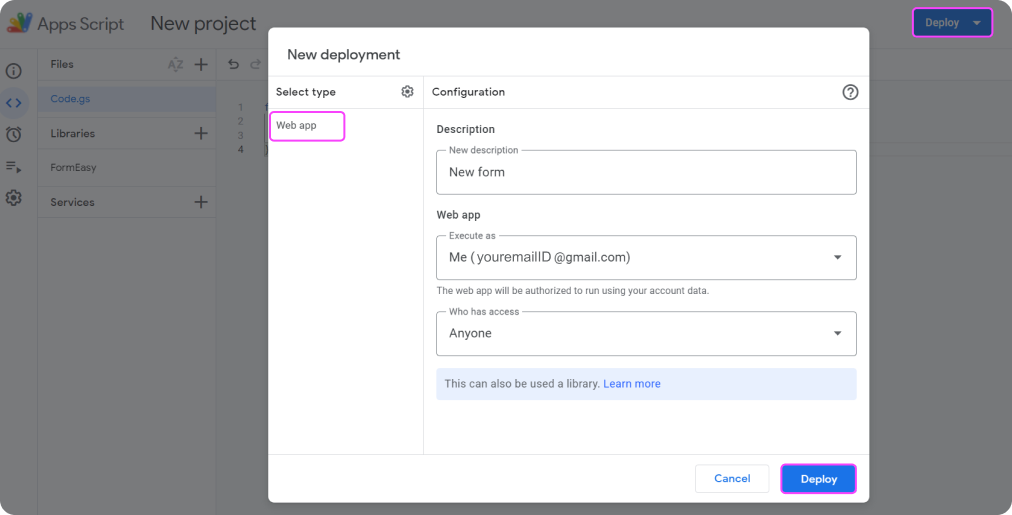
To deploy, click the Deploy button at the top right corner and select New deployment and select type to Web app from the gear icon.
Select/fill the below options
- Description(optional),
- Execute as Me(you email)
- Who has access Anyone
Click the Deploy button(authorize the script if you haven't done it before) and you will get a URL under Web app, copy that and it is going to be the endpoint for submitting the POST requests.
That's it. Now you can submit forms on this endpoint and they get logged in the Google sheet you selected. If you had set email then you will be notified through email whenever any form submission happens.
If you want to make any changes to the script, like changing the subject text, email etc, you can do so and save the script. And while redeploying it instead of selecting New deployment, this time you have to select Manage deployments and click the pencil icon, select the New version, and click the deploy button.
The changes will be get reflected when you make the POST requests after that.
Note: Whenever you make a new deployment, the web app URL changes. But when you redeploy using Manage deployments option the URL remains the same.
Here is how a sample POST request using JavaScript fetch looks like.
const data = {
  name: 'John',
  email: '[email protected]',
  message: 'Receiving forms is easy and simple now!',
};

const url = 'https://script.google.com/macros/s/<Deployment ID>/exec';

fetch(url, {
  method: 'POST',
  headers: {
    'Content-Type': 'text/plain;charset=utf-8',
  },
  body: JSON.stringify(data),
})
  .then((res) => res.json())
  .then((data) => console.log('data', data))
  .catch((err) => console.log('err', err));
If you want to follow all the above instructions in the form of a video you can check this demo video.
As said already FormEasy is an open-source FormSpree alternative. You can check the source code of this library, fork it, make changes, use it yourself or you can contribute your code to the FormEasy Github repo.
Hope this is a good solution to handle contact forms on static websites for FREE. If you have or found any such useful solution for static sites then do share it with us.
Free Tools That Boost Your Productivity
Discover powerful tools that eliminate daily friction and streamline your workflow
Get More Insights Like This
Subscribe to receive development insights, productivity tips, and updates on new tools.